Andy Warhol (kind of) Nails

Thursday, December 26, 2013

Hi guys!

I have some kind of strange nails today, inspired by this post by Elle & ish. Yep, that's a banana. And an apple too! 


The gray base is Deborah Lippmann Pretty Vacant, which is actually a textured polish -- unfortunately I had to put top coat over these, so I lost most of the texture. 

Christmas Nails!

Tuesday, December 24, 2013

Hi guys!

Today I have some Christmas/holiday nails for you. I'm so proud that I got them done on time! 

There were so many Christmas designs I wanted to do, so I decided to do a different design on each nail. Most of these designs are from Cutepolish's Christmas nail art video, with a couple of changes to some designs. 

I'm going to be away over break so these will have to stay on my nails awhile... I'm really happy with them though!


IAnother one of my Christmas gifts was a 15-piece brush set and some dotting tools -- they were very useful while doing these. Now it's time to get to work on my freehand skills :) 

Purple Aztec-y Arrows

Sunday, December 22, 2013

Hi! 

(I feel like I should come up with something to call y'all... like Lacquerbeanz or Goddesses or something... hmm)

First, sorry about not keeping to a regular posting schedule! You wouldn't know if looking at the past couple of weeks, but I try to post Sunday, Tuesday, and Thursday. School and other stuff has just gotten super busy. But after winter break I'm going to try to keep to a more regular schedule!
(The theory is that by telling you this, I'll make myself more committed because I've told someone my goals... well, it was in this self-help book I read!)

Now on to the nail art! 


I used Wet n Wild On a Trip for my non-accent nails, then I used a base of Revlon Spirit and Mash-37 to stamp a sorta Aztec tribal thing on my accent nail.

Black and White MASH Stamping Skittlette

Tuesday, December 17, 2013

Hi!

I recently received an early Christmas present -- a set of 25 MASH stamping plates!! I could have waited until Christmas to use them, but... well... I don't have that much self-discipline :) 
Besides, it seemed wasteful to let them languish on my desk! 

I also have been wanting to try this JINsoon polish I've had for awhile, Soirée (yep, I just did the fancy accent over the "e"! I'm so proud!). 


I started off by painting all my nails white (Revlon Spirit). On my index I added a gold stud from Claire's, on my middle finger is the lovely JINsoon Soirée, and on my ring finger is a stamped geometrical image from Mash-47

NCLA Nail Wraps ft. Harlem Shake

Sunday, December 15, 2013

Hi!

Life has been really busy, so I've resorted to *gasp* nail wraps! At least I used a polish from my untrieds pile: Deborah Lippmann Harlem Shake (nope, not the dance *sigh of relief*).

Thumb, index, middle: NCLA x L'Wren Scott nail wraps
Ring, pinky: Deborah Lippmann Harlem Shake
In this design I was going for a kind of zany, fun look while not being too clashing. 
(I think that last sentence was grammatically challenged) 


The nail wraps were great, except I'm just really bad at applying them!
Harlem Shake was great -- I really like the color, it's a interesting fuschia-pink color, and it has a nice jelly texture. 
But I'm not completely sure whether I like it with the yellow, red, and black on the nail wraps. What do y'all think?

A closeup of my thumb,  you can see just how bad my nail-wrap-applying skills are :)

Anyways, that's all I have today -- hopefully I'll be able to do more detailed nail art soon!

Thanks for reading & be sure to let me know what you think!
Lucy xx

NCLA Nail Wraps & Julep Fiore

Wednesday, December 11, 2013

Hi guys!

Sorry about being kind of nonexistent the last week -- I had a bunch of extracurricular stuff going on (I still do, sigh). It's all fun stuff, but it leaves me with almost no time for nail art :( 

However, I did have time to do a design using nail wraps! (is that cheating?)

NCLA x Peter Som nail wraps & Julep Fiore
One of my family members gave me these nail wraps. These are part of NCLA's collaboration with famous designers -- this one is a collaboration with Peter Som. This design comes in a packet with a dark version of the same design, I'm going to have to try them together one day! 

I paired it with Julep Fiore, which I bought on Black Friday for $1!! They were having a Black Friday sale and I just couldn't resist -- $1 and free shipping?! I'm just surprised I restricted myself to one polish. Did you guys take advantage of the sale too? 

Red and Gold Gala

Tuesday, December 3, 2013

Hi!

Today I have some simple fall-inspired nails to present! 


On my ring finger is JINsoon Gala, a holiday-ish red-gold glittery topper; and on the other fingers is Nails Inc Tate and gold studs from Claire's. 

Dotty Flowers {guest nails}

Sunday, December 1, 2013

Hi!

Happy (belated) Thanksgiving, to those of y'all from the US! I hope you guys had a great Thanksgiving break! (I've seen so many fun turkey designs!) 

Today I did a super simple design on my sister's nails. They're so tiny, it's hard to do anything complicated...


I started with a base of a new polish I got from Claire's, Mint to Be. Then I added dots with a bobby pin dipped in Revlon Spirit and an unnamed Forever 21 red polish. 

Fall Trees {50th Post!}

Saturday, November 30, 2013

Hi!

This is my 50th post!! Whoo!! I'm the kind of person that tends to start projects then abandon them after a week or two, so 50 posts is kind of a big accomplishment for me! 
To reward myself for my "dedication", I bought myself a bottle of polish and my first-ever wheel of studs from Claire's, both of which will be showing up here soon. 

Anyways. The weather is getting colder, and I've switched to my winter boots , fuzzy socks, and warm drinks. It's really feeling like fall now (although we've had some weird warm days) and so I had to do some fall nail art. 

This design was inspired by Robin Moses' "Tree of Life" nail art (link), but I changed up the colors to make it look more fall-y. And I kind of made it more clumsy-looking... because nobody can do nails like Robin Moses.


I started with a base of Nails Inc Kensington Place (see my swatches/review here), then added the tree trunks with brown acrylic paint and a thin nail art brush. Next, I added the leaves of the trees with more acrylic paints, using a dotting motion and a small detailing brush. Finally I sealed the design off with Seche Vite

I applied the top coat too soon, because I forgot acrylic paint dries more slowly than nail polish (especially in when you accidentally put big globs like I did) so it the colors of the leaves kind of washed down the gray base color. I decided to leave it as it was because I actually kind of liked the effect. Whoo, happy accidents!


And of course, I had to add some Fairy Dust to it, because I'm crazily addicted to it. 


And maybe this is just my addiction speaking, but I think it looks all pretty and mysterious, kind of like snow falling between the trees. 


Have you started with the knitted sweaters/hot chocolate/leather boots yet? 

Thanks for reading 
& be sure to let me know what you think of this design!

Nails Inc Kensington Place Swatches

Wednesday, November 27, 2013

Hi!

Today I have a polish from this year's Nails Inc Limited Edition Autumn/Winter collection, Kensington Place.

I don't usually do swatches (nope, not going to put a meme here), but this was a base for some fall nail art I'm posting later this week and it looked so beautiful that it seemed unfair to not do a separate swatch/review post!


Blogger Friendship Award

Tuesday, November 26, 2013

Hi!

Recently (well... actually about a month ago...) I was nominated for a Blogger Friendship Award by Rebenice from Oh No, Not Another Nail Art Blog! (you should definitely check her blog out, she does such amazing and original designs!)


It's pretty similar to the Blog Your Heart Out award -- as far as I can tell, you just state 7 things people probably don't know about you and then nominate seven bloggers. Here we go!

1. I'm in the process of building a pond in my back yard, but I haven't really been working on it since I started this blog... hehe
2.  I can't cook, at all. Whenever I try it's a complete failure -- I can't even make instant mashed potatoes (good thing I'm not living on my own yet!)
3. My favorite punctuation mark is the dash "--"
4. I have been to North America, Asia, and Europe, but no other continents :( But I guess I'm only a teenager so I still have time!
5. I have a elementary-school-aged sister (her nails appear on the blog from time to time)
6. I love writing with Pilot G2 pens and ONLY Pilot G2 pens :)
7. I used to be obsessed with orchids, but now I'm obsessed with nail art!

OK! Now it's time for my nominations!
(yeah... sorry if I also nominated you for the Versatile Blogger Award, I can't keep track of all these things!)


All of these blogs are wonderful and you should definitely check them out!
Thanks again to Rebenice for nominating me!

Thanks for reading!
Lucy xx

Porchester Square Vintage Floral

Monday, November 25, 2013

Hi!

I didn't really have a specific design in mind when I sat down to do these; I just knew I wanted to use Nails Inc Porchester Square in the design. Described as a "chic muted mushroom shade", it's a lovely shade I've been wanting to use for awhile. 

And when I looked at it, it seemed to scream "VINTAGE!!!". So I decided to listen to it and do a vintage floral design (OK. I'm talking about listening to my nail polish. That's... a little odd, but I'm sure many of you can sympathize). 

(Here's my first version of floral nails)


Pink Candy Skittlette

Saturday, November 23, 2013

Hi!

Happy Saturday! 
Today I have a skittlette design based on Deborah Lippmann Candy Shop, a "candy-colored swirl of multi-hued glitter dipped in a juicy bubblegum base".


On my index and pinky, I did Deborah Lippmann Candy Shop over an undie of Deborah Lippmann Shape of My Heart, a light pink polish created to help fight breast cancer (10% of proceeds go toward a memorial hospital in California). 

On my middle finger, I tried making my own decals. First, I transferred an image from MoYou Suki 01 to the stamper with Nails Inc South Kensington. Then I filled in some of the spaces with Sally Hansen Breezy Blue and Nails Inc Queen Victoria Street, to (hopefully) complement the light blue and vivid green glitters in Candy Shop
It took me a couple of tries to get the decal right -- I'm still not all that great at stamping, haha.

Lastly, on my middle finger, I started with a base of Shape of My Heart and added a heart with Wet n Wild Black Creme and a toothpick. 


I had major problems trying to get my camera to focus on the glitter...  


I don't do pink nails very much, but I'm happy with the way these came out! I really like Candy Shop and Shape of My Heart together. 

Thanks for reading & I'd love to hear what you think about this design!
Lucy xx

Green Nimbus Waves

Tuesday, November 19, 2013

Hi!

I can't believe it's only Tuesday! It felt like Friday today for some reason... or maybe that's just me being weird?

But anyways. Recently, the Nailasaurus came out with a new technique: nimbus nail art! (see her tutorial here)
 I decided to try it out, and of course I had to add some extra stamping and glitter. 

The finished product
First, I started with a white base (Revlon Spirit). Then, I did nimbus nail art with Sally Hansen Mint Sorbet, Sephora by OPI Read My Palm, and Nails Inc Queen Victoria Street


Next, I added one coat of China Glaze Fairy Dust (which I'm in love with... like just about everyone else). 


And finally, I added the stamping with MoYou Suki 01 and Nails Inc Chelsea Bridge Road
Yep, the pinky was a complete failure, but all the other fingers turned out pretty well! The nimbus technique was really simple to do and I liked the finished effect. 

But for some reason, even though the stamping and nimbus effect turned out fine, I think these just look a little strange. I don't know why, but I just don't like them for some reason... do you guys ever feel like that about a design you've done? 


What do you think of this design? Do you think it's kinda weird-looking, like me? And are you as much in love with Fairy Dust as I am?  :D

Thanks for reading!
Lucy xx


Guest Post at My Daily Nail Designs: Gumdrops

Sunday, November 17, 2013

Hi!

I was recently contacted by Anita of My Daily Nail Designs to do a guest post! 
It took me forever to decide what to do -- her nail art is so amazing so I felt like I had to kind of, you know, good... but eventually I decided on frosted gumdrop nails.

Here's a sneak peek:


For actual photos and details, check out my guest post.
And be sure to check out My Daily Nail Designs too -- her freehand skills are amazing!

Thanks for reading!
Lucy xx

NCLA Nail Wraps: Bibhu Mohapatra

Friday, November 15, 2013

Hi!

I recently received some wonderful nail mail from my aunt, including some NCLA nail wraps! I received four packs from the collection where NCLA and Glamour partnered with four major designers. Today I tried out the Bibhu Mohapatra wraps -- partly because I didn't have time to do any 'real' nail art :)

(sorry about the terrible pinky thing...)

On my middle and ring fingers are the nail wraps, and the index, pinky, and thumb are RGB Haze, a dusty lavender/grey color (that unfortunately took wayyy too may coats to become opaque for its dark color).


Applying the nail wraps was really simple -- all you have to do is pick the nail wrap of the right size, put it on your nail, and file off the excess (tip: it helps to watch a couple YouTube videos first -- here's a nice one to watch if you want to get really enthusiastic about using nail wraps). I found them really easy to apply, and if I can do it... well... the average chimpanzee could probably do it too.
The only difficult thing was that they stick really firmly once they're on the nail, so you can't take them off and adjust without ruining the adhesive. 

Here are some color-adjusted photos so you can see the actual color of the polish/nail wrap:


The problem is that these wraps are limited edition (from winter 2013) and aren't sold in stores or at NCLA's online store. You might be able to find them by hunting on eBay or Amazon, though... I looked around a little and there didn't seem to be much. But I figured I should show you my first attempt at using nail wraps anyways :)

Have you ever tried nail wraps? Or are you more of a solid-color/freehand nail art person?

Thanks for reading!
Lucy xx

Movember/Gay Pride Nails

Wednesday, November 13, 2013

Hi!

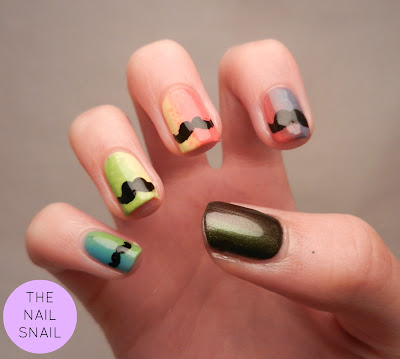
It's Movember! You've probably heard quite a lot about Movember by now, but it's basically a month to raise awareness and funds for men's health issues (especially prostate cancer and other male-specific cancers). A lot of guys are growing out their moustaches this month, so I decided to grow a moustache too -- on my nails, that is. 

I didn't want to be normal and put them over a plain base, so I decided to do them over a rainbow gradient. Only after I finished did I realize "hey, these could be gay pride AND Movember nails all in one!" 

So I present to you my gay pride & Movember nails!

moustache nails

I used Sally Hansen Blue Me Away, Sinful Colors Timbleberry, Sally Hansen Mellow Yellow, and Sephora by OPI It's Totally Karma for the gradient, then added the moustaches with Wet n Wild Black Creme. On my thumb I decided to try Jin Soon Epidote, because it's an awesome duochrome polish that I really need to swatch soon! (it looks a little odd here though)


Movember and gay pride are both great causes, and moustache nails were -- of course -- really fun to do.


Are you planning on doing moustache nails this month? (or gay pride nails... even though I guess those would be more of a June thing?) 

Also, I really did mean to do pink nails last month for breast cancer awareness, and I did but somehow the photos disappeared from my computer and I had already removed them and didn't have time to re-do them... it was a mess. If I find them I'll definitely post them, though!

Thanks for reading! 
Lucy xx

Versatile Blogger Award

Sunday, November 10, 2013

Hi!

So recently, I was nominated for the Versatile Blogger Award by Lucky Lucky Lacquer and My Daily Nail Designs. Thanks so much, guys! It means a lot to me -- I never thought people would actually read my blog when I started it! (And while I'm in this emotional mood -- thanks to all of you guys who leave awesome comments! I love reading every single one!)


Bamboo Stamping

Friday, November 8, 2013

Hi!

I recently received my MoYou Suki 01 stamping plate! It has a couple beautiful patterns as well as images of birds, flowers, branches, owls, and my personal favorite -- bamboo. 


This stamped with Nails Inc. Chelsea Bridge Road (of their foil collection) on Nails Inc. Queen Victoria Street

For my third attempt at stamping, I think it came out all right (definitely better than my first attempt at stamping!) 


Have any of y'all tried MoYou stamping plates/what did you think of them? I'm thinking about getting the Sailor one...

Thanks for reading!
Lucy xx

MoYou Suki Plate Stamping

Thursday, November 7, 2013

Hi!

Recently, I received my first ever stamping plate -- the MoYou Suki collection 01 plate. It has a lot of really amazing patterns (the one below, zebra stripes, waves, abstract stuff) and some really beautiful images (which will be coming later this week!). 

Unfortunately, my stamping skills aren't quite up to par -- stamping is a LOT harder than the YouTube tutorials made it look! 

First attempt
This is Nails Inc. South Kensington (of the Nails Inc. foil collection) stamped on Nails Inc. Baker Street

Second stamping

And here's my second attempt at stamping! It looks interestingly vintage-y, I guess..

Does anyone have any magical tips/tricks for stamping? Or is the key to just stamp a lot? (which I'll definitely be doing regardless) Have you tried any of the MoYou plates?

Thanks for reading!
Lucy xx

Wet n Wild Rain Check Swatches

Sunday, November 3, 2013

Hi!

My birthday was a few days ago, and I got a fair amount of nail polish from my friends/family. There are so many pretty ones I want to swatch! (thanks guys!!) Today I have Wet n Wild Rain Check to show you.


It's a beautiful gray/blue color, shimmery, and kind of soft looking. It looks almost sleepy, if that makes sense. Shown is four coats with Seche.


Application was fair enough, the brush (like all the WnW Shines) was super thin, which I personally don't like. It was a little annoying that it took four coats to get to opacity. Other than that, I have no complaints! 


It looks so magical...

My final verdict: Get it! Although it's a little annoying in terms of opacity, it's a beautiful polish, especially for $0.99!

Thanks for reading!
Lucy xx

Pumpkins!

Wednesday, October 30, 2013

Hi!

I finally got around to doing some Halloween nail art! 

I wanted to try some Halloween splatter nail art but I didn't have a straw, so I decided to do some freehand stuff instead!

The glossy version
I started with a base of Deborah Lippmann Lara's Theme, added some light orange stripes with acrylic paint, then added the faces/leaves with Wet n Wild Black Creme and a green polish I can't find (yeah, I am disorganized...). 

I think these came out pretty well -- my lines aren't very crisp, but you can tell they're pumpkins! I had a little accident with the face on my middle finger but I didn't have time to redo it.

The matte version
And of course I had to try them matte as well!

I have a bunch of Halloween designs on my to-do list but somehow I kept delaying them. I guess I"ll just be that person who keeps doing Halloween nail art until December! 

What has been your favorite Halloween nail art so far? I definitely want to try ghosts! 

Thanks for reading!
Lucy xx

P.S. Sorry - the end of the first quarter is coming so I've had a bunch of stuff for school, but soon I'll get back to blogging more often/reading y'all's blogs!


Grunge Nail Fail

Saturday, October 26, 2013

Hi!
Recently I've been seeing a lot of grunge nail art out there (see Hey, Darling Polish's version and Chalkboard Nails' version). I think it looks really interesting! My version... well... you can see for yourself. 


Grungy? Yes. But as I was aiming for something more like Chalkboard Nails' version (see link above), it looked a little too grungy. 


To get the streaky look, I just wiped most of the polish off the brush, then swiped it down my nail. It made it look quite grungy, but it was hard to control how much polish got on your nail, which led to me putting on way too much black polish.


This last photo shows it especially well -- I put WAY too much black on.

I guess it still looks interesting, but it's definitely not what I was aiming for... have you tried grunge nails? Have you had any bad nail fails lately? Let me know what you think in the comments!

Thanks for reading and have a great weekend!
Lucy xx

P.S. I was looking at my blog from a different computer today and it looked completely different... instead of light purple the accents were a bright fuchsia color! It displays fine on all my Mac stuff and on my HP laptop, but on certain computers it just looks.. weird. In my photos, my hands look super red! Does the blog look weird to you guys? And does anyone know how can I make it display consistently?

Neon & Nude Nails

Thursday, October 24, 2013

Hi!

Today I have a nude/neon combination to share with you (do you like the alliteration in the post title? :D). These are my sister's nails, and they're TINY (note the size of the SV bottle compared to her hand) so it's always really difficult to come up with a good design for them!
But this week I just decided to take the plunge and do something like I would do on my own nails. This design was inspired by Dipped in Lacquer's post (link).


I used Sephora by OPI Neutral Beauty for the base, then added Sally Hansen Mellow Yellow (thumb), Deborah Lippmann Lara's Theme (index), Sephora by OPI It's Totally Karma (middle), some polish I don't remember (ring) and a Love & Beauty unnamed red polish (pinky). 

I used a striping brush for all the details. It was actually a lot quicker than I expected!


I think my sister is better at posing her hand than I am... 


Leave a comment and let me know what you think :) 

Thanks for reading,
Lucy xx